Spring Restful Web Servis CRUD Uygulama Örneği
Spring MVC kullanarak bir web servis oluşturacağız. Bu web servis bize JSON formatında bir çıktı üretecek. Bu çıktıda bizim örneğimizde oluşturacağımız Öğrenci bilgilerini görüntüleyeceğiz. Oluşturduğumuz Restful Web Servis sayesinde;
- Tüm öğrencileri görüntüleme
- Belirli bir Id’li öğrenciyi görüntüleme
- Öğrenci ekleme
- Öğrenci bilgilerini düzeltme
- Öğrenci silme
işlemlerini Spring ile Restful Web Servis yeteneklerini kullanacağız.
Bir Maven projesi oluşturacağız. Bu Maven projesinin bağımlılıkları aşağıdaki gibi olacaktır.
  <dependencies>
        <dependency>
            <groupId>javax.servlet</groupId>
            <artifactId>javax.servlet-api</artifactId>
            <version>3.1.0</version>
        </dependency>
        <dependency>
            <groupId>org.springframework</groupId>
            <artifactId>spring-core</artifactId>
            <version>${spring.version}</version>
        </dependency>
        <dependency>
            <groupId>org.springframework</groupId>
            <artifactId>spring-webmvc</artifactId>
            <version>${spring.version}</version>
        </dependency>
        <dependency>
            <groupId>com.fasterxml.jackson.core</groupId>
            <artifactId>jackson-databind</artifactId>
            <version>2.4.1</version>
        </dependency>
    </dependencies>
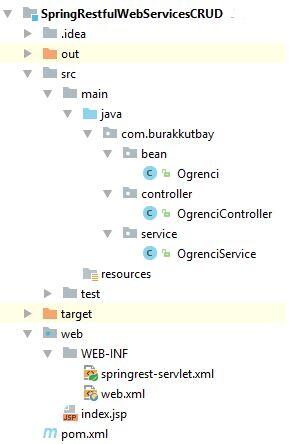
Projemizin klasör yapısı ise şöyle olacaktır.

Öğrenci sınıfımızı oluşturalım.
public class Ogrenci {

    private int id;
    private String ad;
    private String soyad;
    private String alan;

    public Ogrenci() {
        super();
    }

    public Ogrenci(int id, String ad, String soyad, String alan) {
        super();
        this.id = id;
        this.ad = ad;
        this.soyad = soyad;
        this.alan = alan;
    }

    public int getId() {
        return id;
    }

    public void setId(int id) {
        this.id = id;
    }

    public String getAd() {
        return ad;
    }

    public void setAd(String ad) {
        this.ad = ad;
    }

    public String getSoyad() {
        return soyad;
    }

    public void setSoyad(String soyad) {
        this.soyad = soyad;
    }

    public String getAlan() {
        return alan;
    }

    public void setAlan(String alan) {
        this.alan = alan;
    }
}
Servis katmanımızı oluştutralım. Bu katmanda demo verilerimizi ve metodlarımızı oluşturacağız. Bu metodlar CRUD işlemlerini yapan metodlar olacak.
public class OgrenciService {

    private static HashMap<Integer, Ogrenci> ogrenciHashMap = getOgrenciHashMap();

    public OgrenciService() {
        super();
        if (ogrenciHashMap == null) {

            ogrenciHashMap = new HashMap<Integer, Ogrenci>();

            Ogrenci ogrenci1 = new Ogrenci(1, "Burak", "Kutbay", "Fen");
            Ogrenci ogrenci2 = new Ogrenci(2, "Ali", "Doğru", "Edebiyat");
            Ogrenci ogrenci3 = new Ogrenci(3, "Veli", "Yanlış", "Biyoloji");
            Ogrenci ogrenci4 = new Ogrenci(4, "Ahmet", "Mehmet", "Matematik");

            ogrenciHashMap.put(1, ogrenci1);
            ogrenciHashMap.put(2, ogrenci2);
            ogrenciHashMap.put(3, ogrenci3);
            ogrenciHashMap.put(4, ogrenci4);
        }
    }

    public static int getMaximumId() {
        int max = 0;
        for (int id : ogrenciHashMap.keySet()) {
            if (max <= id) {
                max = id;
            }
        }
        return max;
    }

    public static HashMap<Integer, Ogrenci> getOgrenciHashMap() {
        return ogrenciHashMap;
    }

    public List<Ogrenci> getAllOgrenciler() {
        List<Ogrenci> ogrenciler = new ArrayList<Ogrenci>(ogrenciHashMap.values());
        return ogrenciler;
    }

    public Ogrenci getOgrenci(int id) {
        Ogrenci ogrenci = ogrenciHashMap.get(id);
        return ogrenci;
    }

    public Ogrenci ekleOgrenci(Ogrenci ogrenci) {
        ogrenci.setId(getMaximumId() + 1);
        ogrenciHashMap.put(ogrenci.getId(), ogrenci);
        return ogrenci;
    }

    public Ogrenci guncelleOgrenci(Ogrenci ogrenci) {
        if (ogrenci.getId() <= 0)
            return null;
        ogrenciHashMap.put(ogrenci.getId(), ogrenci);
        return ogrenci;
    }

    public void silOgrenci(int id) {
        ogrenciHashMap.remove(id);
    }
}
Servis katmanında ne yaptığımıza bakalım. Öğrenci türünden bir HasMap oluşturuyoruz. Bu HasMap sayesinde Öğrenci bilgilerini tutacağız. Demo veri olarak ise bir kaç veri giriyoruz Öğrenci HashMap’ımıza ekliyoruz. Diğer yaptığımız işlemler ise CRUD işlemlerinin yapıldığı servis işlemleridir.
Şimdi sonra Controllerımızı oluşturalım. Controllerımız Restful Webservisimizin yapması gereken iş ve işlemlerinin metodlarının bulunduğu bir sınıf olacaktır. Şimdi bu controllerımızı oluşturalım ve sonrasında kod bloklarının ne yaptığını açıklayaayım.
@RestController
public class OgrenciController {

    OgrenciService ogrenciService = new OgrenciService();

    @RequestMapping(value = "/ogrenciler", method = RequestMethod.GET, headers = "Accept=application/json")
    public List<Ogrenci> getOgrenci() {
        List<Ogrenci> ogrenciListesi = ogrenciService.getAllOgrenciler();
        return ogrenciListesi;
    }

    @RequestMapping(value = "/ogrenci/{id}", method = RequestMethod.GET, headers = "Accept=application/json")
    public Ogrenci getOgrenciById(@PathVariable int id) {
        return ogrenciService.getOgrenci(id);
    }

    @RequestMapping(value = "/ogrenciler", method = RequestMethod.POST, headers = "Accept=application/json")
    public Ogrenci ekleOgrenci(@RequestBody Ogrenci ogrenci) {
        return ogrenciService.ekleOgrenci(ogrenci);
    }


    @RequestMapping(value = "/ogrenciler", method = RequestMethod.PUT, headers = "Accept=application/json")
    public Ogrenci guncelleOgrenci(@RequestBody Ogrenci ogrenci){
        return ogrenciService.guncelleOgrenci(ogrenci);
    }


    @RequestMapping(value = "/ogrenci/{id}" ,method = RequestMethod.DELETE,headers = "Accept=application/json")
    public void silOgrenci(@PathVariable("id") int id){
        ogrenciService.silOgrenci(id);
    }
}
Controller sınıfımızı @RestController anatasyonu olarak belirtiyoruz. Kullanacağımız metodların üzerine @RequestMapping olarak işaretliyoruz. @RequestMapping olarak işaretlediğimiz metodun nasıl bir Restful Web Servis olduğunu belirtiyoruz. Şimdi bu anatasyonun attributelerini inceleyelim.
- “Values” attiributesi hangi http adresinden çağıralacağını belirlemektedir. Bu örneğimizde localhost/ogrenciler adresinden restful web servisemize ulaşabileceğiz.
- “Method” attiributesinin aldığı değerler;
- RequestMethod.GET : Sunucudan veri almak için kullandığımız yöntemdir.
- RequestMethod.POST : Veritabanı işlemleri için kullandığımız yöntemdir.
- RequestMethod.PUT : Veri ekleme için kullandığımız yöntemdir.
- RequestMethod.DELETE : Veri silme için kullandığımız yöntemdir.
- headers = “Accept=application/json” diyerek Json formatında olduğunu belirtiyoruz.
Şimdi index.jsp sayfamızı oluşturalım.
<%@ page contentType="text/html;charset=UTF-8" language="java" %>
<html>
<head>
    <title>Spring Restful Web Service</title>
</head>
<body>
Merhaba Dünya
</body>
</html>
Spring konfigürasyonumuzu oluşturalım.
<?xml version="1.0" encoding="UTF-8"?>
<beans xmlns="http://www.springframework.org/schema/beans"
       xmlns:xsi="http://www.w3.org/2001/XMLSchema-instance" xmlns:mvc="http://www.springframework.org/schema/mvc"
       xmlns:context="http://www.springframework.org/schema/context"
       xsi:schemaLocation="http://www.springframework.org/schema/beans http://www.springframework.org/schema/beans/spring-beans.xsd http://www.springframework.org/schema/mvc http://www.springframework.org/schema/mvc/spring-mvc.xsd http://www.springframework.org/schema/context http://www.springframework.org/schema/context/spring-context.xsd">

    <mvc:annotation-driven/>
    <context:component-scan base-package="com.burakkutbay.controller"/>
</beans>
Bu xml dosyasında controller paketimizin spring tarafından taranmasını istedik. Web.xml dosyamız ise şu şekilde olacaktır.
<?xml version="1.0" encoding="UTF-8"?>
<web-app xmlns="http://xmlns.jcp.org/xml/ns/javaee"
         xmlns:xsi="http://www.w3.org/2001/XMLSchema-instance"
         xsi:schemaLocation="http://xmlns.jcp.org/xml/ns/javaee http://xmlns.jcp.org/xml/ns/javaee/web-app_3_1.xsd"
         version="3.1">

<servlet>
    <servlet-name>springrest</servlet-name>
    <servlet-class>org.springframework.web.servlet.DispatcherServlet</servlet-class>
    <load-on-startup>1</load-on-startup>
</servlet>
<servlet-mapping>
    <servlet-name>springrest</servlet-name>
    <url-pattern>/</url-pattern>
</servlet-mapping>

</web-app>
Projemizi çalıştıralım ve sonucuna bakalım.
Merhaba Dünya
Tarayıcımızdan girdiğimizde bizi bir jsp dosyası karşılamakta ve merhaba dünya demekte. Biz Restful Webservis ile Öğrenci bilgilierini görmek gerekirse güncellemek ya da silmek istiyoruz. Bunun için POSTMAN’ı açalım. ( POSTMAN Nedir? derseniz burada anlatmıştım tıklayınız. )
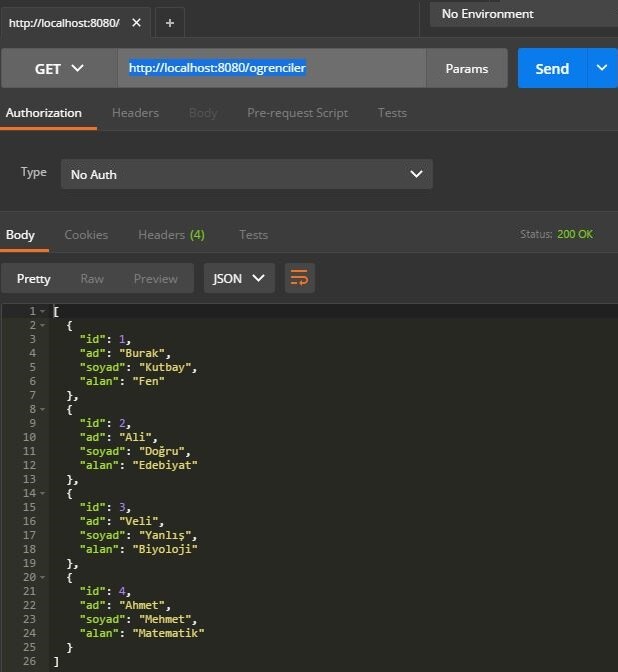
Postmanı açtıktan sonra adres olarak http://localhost:8080/ogrenciler yazalım ve GET yöntemini bularak Send tuşuna basalım.

Dönün sonuç yukarıdaki ekran gibi olması beklenmelidir.
Eğer belirli bir ID’li öğrencinin bilgisini getirmek istersek;

Şeklinde görüntüleyebiliyoruz.
Öğrenci listesine bir veri ekleyelim.

Öğrenci silme işlemi için ise;

İşlemlerini geçekleştirebilmekteyiz.
Spring MVC ile Restful Web Servis ile iş ve işlemleri bu şekilde yapılmaktadır.
Projenin Kaynak Kodlarını Github Üzerinden Görünlüte / İndir
Çok faydalı bir proje anlatımı olmuş çok teşekkürler